


DIY Chunky Felt Christmas Garland – The Cutest Felt Paper Chain Tutorial

If you’re looking for a Christmas craft that brings all the nostalgia of those school paper chains but actually holds up year after year, this DIY chunky felt Christmas garland is the one. It feels whimsical, a little Anthropologie-ish, and honestly just makes your home feel softer and cozier for the holidays.
This is our first Christmas in our new home, and I’m deep in my “must make childhood core memories” era. My son is six, which feels like the perfect age for magic, so Craftmas this year is all about leaning into joy, colour, and handmade moments. And this garland might be one of my favourites.
Let’s jump in, because she’s chunky, she’s cute, and she absolutely stole my heart.
Why Felt Instead of Paper?
I’ve been seeing those gorgeous oversized paper chains everywhere online, and while I love the look, I wanted something sturdier. Something I could pack away with the stockings and pull out every December without them crumpling or ripping.
Felt was the obvious answer. It’s soft, durable, and brings that cozy winter texture that instantly feels festive. And when you make the links thick and chunky, it gives this beautiful, plush look that feels way more expensive than it is.
Supplies I Used
A few tools made this about ten times easier, especially because we’re cutting a LOT of strips.
- Felt sheets in the colours you love. I mixed pinks, reds, greens, and a pop of blue.
- Hot glue gun (this Surebonder one is my favourite, it heats fast and doesn’t drip).
- Rotary cutter for smooth, clean cuts.
- Quilting ruler sized perfectly so you don’t measure every strip.
- Cutting mat to protect your table.
You can view the whole product list here on my Amazon
Step 1: Choosing Your Colours
I’m not a pastel Christmas girl (love them, just not for my house) so I pulled all the felt sheets I didn’t want out of the pile first. Then I narrowed it down to a palette that felt fun and festive but still cohesive: reds, pinks, greens, and that perfect dusty blue.
If you’re doing this yourself, lay everything out together before you start cutting. Felt looks way brighter in big stacks, so you want to make sure it all plays nicely.

Step 2: Cut All Your Felt Strips
Each link is 2.5 inches by 8 inches, which is exactly why having a quilting ruler in that size is a total lifesaver. You’re not measuring, you’re not guessing, you’re not trying to hold down a floppy piece of felt with one hand while eyeballing the numbers, the ruler is the template. It’s literally the exact size you need, so you just line it up, run your rotary cutter along the edge, and slice. Move the ruler down an inch, slice again. Repeat 700 times (Okay… maybe not 700. But mentally? Spiritually? It was 700.)


I used the Omnigrid 2.5″ x 8″ ruler with my Fiskars rotary cutter on a cutting mat, and honestly it made the process borderline therapeutic. Everything stays straight, the cuts stay clean, and the whole setup just makes you feel like someone who really has their life together, even if you’re still in pajamas making a mountain of felt strips at 10 p.m.
Step 3: Start the First Link
Grab your first felt strip and run a thin line of hot glue right down the centre, truly thin. If you get too close to the edge, it’ll squeeze out the sides and leave those shiny little glue boogers we’re not trying to showcase on a holiday garland. I used my Surebonder glue gun, which is my ride-or-die for felt projects because it grips quickly and doesn’t leave those weird, crunchy hard spots some glue guns do.
Once your glue is on, bring the two ends together to form a little loop and hold it for a second or two. Felt bonds fast, so you don’t need to stand there doing hand yoga. Press, let it set, and boom, that’s your very first link. The start of something chunky and magical.

Step 4: Add Your Second Link (Without Twisting Everything)
This is where it can get messy if you’re not paying attention. Keep your chain flat on the table.
Slide your next strip through the loop, check which direction your fold is going, then glue and press it down. I like all my glued flaps facing the same direction so the chain looks clean and intentional.
Once you get into a rhythm, it’s easy. Glue → press → rotate → repeat.

Step 5: Build Out the Chain
Keep feeding each new strip through the last link, adding your glue, and pressing it into place. Once you get into the rhythm, this is the part that becomes surprisingly peaceful, the kind of repetitive craft that lets your brain take a little holiday of its own. Put on a Christmas movie you’ve already seen ten times, light a candle that smells like “Cinnamon Forest Wonderland” or whatever festive scent you grabbed at Target, and just settle in.
As the chain starts getting longer (and longer… and longer), let it drape off the edge of your table so it doesn’t twist or tangle on itself. It’ll pool onto the floor like a soft little rainbow waterfall, and it makes it so much easier to keep the rhythm going without stopping to rearrange everything every five minutes.

Step 6: Test the Length on Your Banister
At one point, my garland got so long I genuinely wondered if I had blacked out and cut enough felt to decorate an entire neighbourhood block. You reach this moment where you’re holding a never-ending rainbow noodle of felt and thinking, “Surely… surely I’m done?” Spoiler: you’re not done. Not yet.
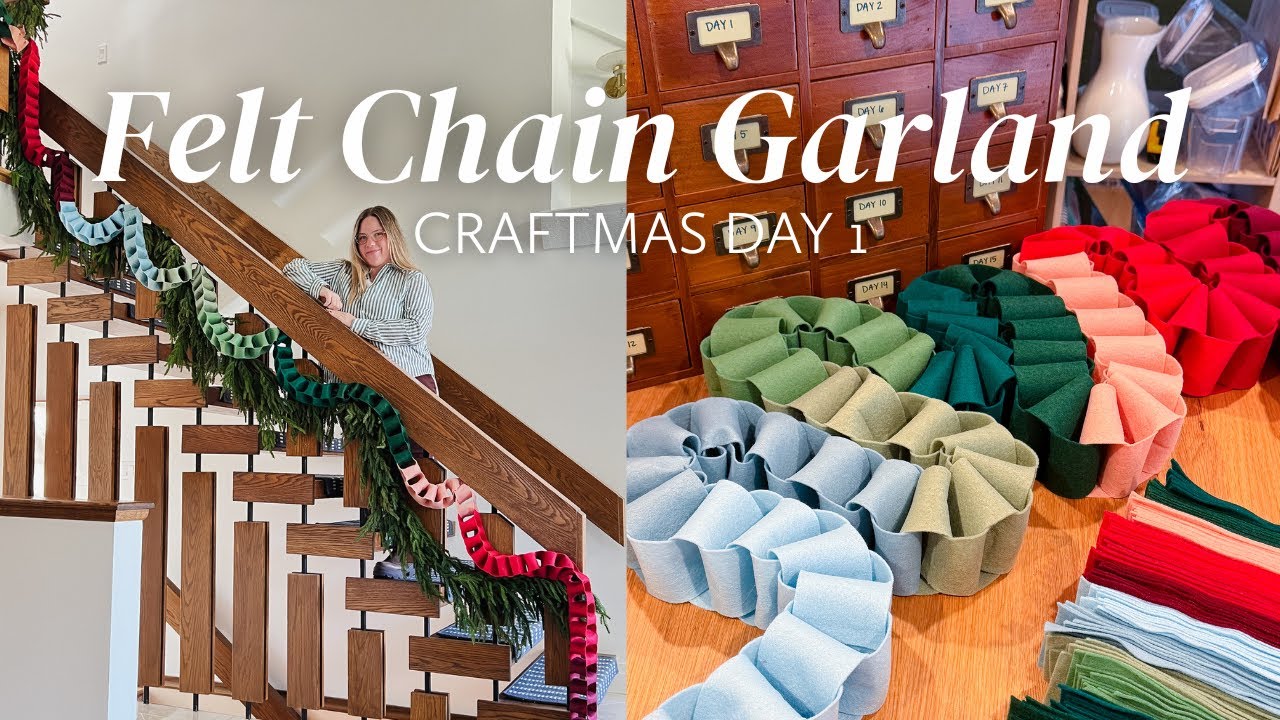
This is the perfect time to take it over to your staircase or mantel and test the drape. And honestly? This is the moment the magic happens. I clipped mine onto the banister just to check the length and immediately had that Anthropologie holiday catalogue flashback. Chunky, colourful, perfectly whimsical, like something you’d see displayed next to a $58 ceramic fox and a velvet stocking with tassels.
Testing the length also helps you catch any colour clumping. Sometimes one shade sneaks in too often and suddenly your garland has a “red-heavy moment.” No big deal, just pull apart the last few links and tweak the order. The beauty of felt is that it’s forgiving, and once it’s hung up, it all blends into this soft, cozy wave of colour.

Step 7: Finish and Hang
Once you’re happy with the length, snip away any glue strings, fluff out the loops, and hang it wherever you want:
- staircase bannister
- mantel
- doorway
- wrapped around a tree
- draped across furniture
- layered over fresh greenery
Over greenery is one of my favourites, the felt pops so beautifully against it.
A Few Helpful Tips
- Use less glue than you think. Felt soaks it up fast.
- Keep the chain flat while you’re working. It prevents twisting.
- Don’t overthink colours. Once it’s hanging, it looks magical.
- Store it flat when the season’s over so it keeps its shape.
- You can get my supply list for this craft on Amazon at this link.
Why This Craft Is Perfect for Kids Too
This whole project started because I wanted my son to have a magical holiday in our new house. He helped me sort colours and feed the felt through, which honestly made the whole thing sweeter. Kids love repetitive crafts like this, and it’s a great way to get them involved without handing them a hot glue gun (please don’t).
Final Thoughts
This DIY chunky felt Christmas garland is everything I wanted; cozy, colourful, nostalgic, and sturdy enough to use year after year. The texture is gorgeous, the colours are joyful, and it adds so much personality to our staircase. If you’re craving a handmade holiday this year, this felt paper chain garland tutorial is the perfect starting point.

FAQs for a DIY Felt Christmas Garland:
To make a chunky felt Christmas garland, cut felt into 2.5″ x 8″ strips, glue each strip into a loop, and keep feeding new strips through just like a paper chain. It’s simple, repetitive, and creates that soft, oversized look everyone loves. My tutorial walks you through the tools, cutting method, and glue technique to get a clean, uniform garland.
Medium-weight craft felt works best. It’s thick enough to hold its shape but still soft enough to glue easily. I used multi-coloured felt bundles to get that playful, chunky Christmas look without the links sagging.
For a standard bannister or mantel, plan for 60–100 strips. If you want a dramatic, full “Anthropologie holiday” drape, aim closer to 100–120+. Felt garlands look best when they’re long and chunky, so don’t be afraid to make more than you think you need.
Keep the chain completely flat while you glue each link, and make sure every folded flap faces the same direction. This keeps the garland uniform and prevents the links from spiraling or twisting when you hang it.
Fold it gently like an accordion and store it flat in a bin, away from heavy items that could squash it. Felt holds its shape well, so as long as it’s stored flat, your garland will look brand-new every year.

Meet Krystle

Let’s Stay Connected

Don't Miss A Thing


